Wednesday, August 31, 2016

JAVA 11 - Array ... list. ArrayList!

Didn't we do this already?  No!  Last time we looked at arrays, and today we're looking at array lists.

Arrays go back a while to the roots of Java in languages like C.  It's important to know they exist, but they're a bit limited and clunky, and have had their day, like a VHS copy of Friends.


ArrayList is much more flexible, and has a ton of useful features built into it.  You can basically loop through, add, remove elements as you need.

My co-worker Dan says "why would you EVER need to use arrays again?".

You can declare an ArrayList as ...

ArrayList<variable> listName = new ArrayList <variable>;

Where,

  • Variable is the kind of variable you want to use.
  • listName is the name of the list you're using [I'm starting to sound like an ISTQB definition here]

So to declare String, int or variable ArrayLists is ...

ArrayList<String> listName = new ArrayList <String>;

ArrayList<int> listName = new ArrayList <int>;

ArrayList<doube> listName = new ArrayList <double>;

Notice with all of these, we didn't need to specify a size as we went.

We can then for instance add elements as we go by ...

listName.add("Pugh");
listName.add("Barney McGrew");
listName.add("Cuthbert");
listName.add("Dibble");
listName.add("Grub");

For each .add, listName expands as it adds.

Likewise we can decide that having double "Pugh" is a mistake (it isn't), and so remove an element with,

listName.remove(1);

Which will remove the element at 1 (remember in array counting, this is actually the 2nd item).

We can also use the .get(n) command to find the value at the nth position in the list.  So,

listName.get(1)

After our remove will return "Barney McGrew".

Finally, and what's ever so useful, we can use a special version of for with ArrayLists,

for( var varName : listName )

This will step through each item in the ArrayList, where

  • var is the type of variable in the ArrayList
  • varName is the name of an instance
  • listName is the name of the ArrayList

Basically for each loop, varName is assigned to the value of the next element in the list, until you've reached the end of the list.

So for our modified rollcall,

for( string surname : listName )
{
    System.out.println(surname);
}

Will produce,

Pugh
Barney McGrew
Cuthbert
Dibble
Grub

If you're wondering why these might sound familiar ...


Back to our competition

I decided to have two winners for our competition - one selected by Array, the other by ArrayList.

[To use ArrayList, don't forget to import java.util.ArrayList and import java.util.List;]


Here you can see I declare an ArrayList of entrants of type List.  I commented out @miller_alaine, as she won last time.

I can find the size of my list using the entrants.size() method.

I get a random number winnerNum, and use entrants.get(winnerNum) to get the Twitter handle of the list.

Something I couldn't do before - I can then remove the winner from my list with entrants.remove(winnerNum).

I then look though the Twitter of the remaining entrants to get a list of those who go home empty handed (sorry folks).

When I run this code, I get ...


Well done Sandeep!

The code for this is here in Github.

Extension material

It's well worth reading more about ArrayLists.  Google around to find other sources of information.


Why do we declare List and not ArrayList?

I've had one of our senior Java developers make a suggestion to this code, which I've since implemented.

Originally I declared my ArrayList as an ArrayList type,

ArrayList<String> entrants = new ArrayList<String>();

However I was told this is considered bad practice, and normally they use,

List<String> entrants = new ArrayList<String>();

You can read up why here.  But in a nutshell, ArrayList is a kind of List, but if you use ArrayList in the declaration, you lose the interface to some List features and flexibility.

JAVA 10 - Arrays

Way back in JAVA 4 we looked at declaring and using variables - and we've been using them ever since.


Sometimes though we need a multiple grouping of an item.  For instance, name - you have your own name obviously.  But remember back in school and your teacher called a register for class to see who was present?

For something like that you need a grouping of names ... which we call an array.

Here are a couple of examples,

String[] rollcall = { "Pugh", "Pugh", "Barney McGrew", "Cuthbert", "Dibble", "Grubb" };

Here,

  • the [] square brackets declare we're calling an array of Strings.  
  • rollcall is the name of the array
  • the {} brackets hold our list of items
  • "Pugh" - each item in quotes is an item in our array - we have 6 in all


Elsewhere, we can extract an item from our array by going ...

name[index]

  • name - is the name of the array, obviously
  • index - is the nth number in the array.  Now an important thing to know about it index is it starts from 0.


So,

  • rollcall[0] returns our first item "Pugh"
  • rollcall[5] returns our last item "Grubb"
  • rollcall[6] produces an error

You could also declare arrays for double or ints,

int[] eyesFingerKneesToes = { 2, 10, 2, 11 };

double[] percentComplete = { 22.3, 30.2, 82,1 };

You can also declare an array as empty, and then add values to it later ...

eyesFingerKneesToes = new int[4];
eyesFingerKneesToes[0] = 2;
eyesFingerKneesToes[1] = 10;
eyesFingerKneesToes[2] = 2;
eyesFingerKneesToes[3] = 11;

What's important to know though - once you've declared your array, you can't make it bigger.  It's a bit of a limitation of arrays, but next time we'll talk about ways around it.

Competition Draw

Here's an example I know you've been dying to see - yes, I'm using software for my competition draw!

Building on some unit testing we did a while ago, I've a class (shhh ... spoilers) which allows me to choose a random number.

Here's the JUnit test though I use this to do my draw ...


Here I declare an array of entrants who replied to my blog.

I can access methods and data within the entrants array, so when I choose entrants.length, it tells me the number of entrants in that array (I know I could count, but this is more fun).

I use that to define the maximum number I want, and get a random number winnerNum back.

I then reference the Twitter handle of the winner by using entrants[winnerNum].

From this we clearly see ...

Well done Alaine Miller!

Was it a fair draw?

I actually had another check inside my JUnit tests - which you might remember from looking at unit tests here.

This function is a much more complex in it's use of loops and arrays ...


This runs 800,000 draws for 8 entrance, making sure they're all within 1% of each other.  It does this by creating countArray - where it counts the number of 0, 1 ... 8 results.  So countArray[4] tells how many times the number 4 has come up etc.

I loop through 800,000 rolls, then loop through the values 0 ... 8 to make sure each is about 1/8 of the number of selections.

That's as fair as I can get it!

You can find the code for this here.


Extension material

Read more about arrays here.

If experimenting around with this yourself, you will need to import java.util.Arrays.

JAVA 9 - Repeating ourselves with loops ...

In the famous animation The Sorcerers Apprentice, Mickey Mouse as an apprentice wizard, charms a broom to become animated, and repeat a task again, and again, and again ...


What do we use in code to allow us to repeat tasks?  For instance, let's go back to our multilinguage "Hello World" method, which is now patched up to look like this ...


Now, say we have a pressing business need to print out "Hello world" 10 times.  I guess we could do the following function using "the power of cut and paste"...


It's kind of messy.  And what if someone changed requirements on us, and it's now got to be 20 times ... and in French.  That's a lot to change.  [Hint - in code we want to make software where we can make such modifications with as few changes as possible]

The solution to this is today's topic - the use of loops.  Loops allow us to repeat an action a number of times until an exit condition is reached - we can even have it so the action modifies according to the number of loops.

The for loop

The for loop is by far the most commonly used in Java, it has the following syntax ....

for ( initialise ; condition ; action2 )
{
    action1;
}

  • initialise - this is an action undertaken when you first enter the loop.  It is not repeated on subsequent loops.  Typically you have something like "int counter = 0" where you both declare and initialise a counter variable.
  • action1 - this can actually be a whole series of statements, which is performed each time a loop occurs
  • condition - this reduces to a boolean true or false statement.  As long as it's true, the loop will keep performing action1 and action2.  For instance "counter < 10" will keep looping until counter variable has exceeded 10.  You can chain together complicated statements such as "(counter < 10) && (valX > 0)" which will repeat as long as counter is below 10 and valX is greater than 0.
  • action2 - this is an action which is performed at the end of every loop.  In truth you could probably put this at the end of action1 if needed.  However typically it's to do with changing something to do with the condition under evaluation, and making it clear and visible.  An example would be "counter++" which increases the value of counter - something which is often called "stepping".
Here's the code we use to create a for loop for our problem.  You can find it here,


The while loop

The while loop has the following syntax,

while (condition)
{
    action1;
}

Basically it keeps performing action1, as long as condition is true.  It may loop simpler syntactically than for-loop, but generally for-loops are the preference - mainly because you can tie up the initialisation and stepping etc inside the for-declaration.

To create a while loop, it looks like this ...


Notice how here we have to have have any initialisation before our loop statement and our stepping inside the loop.

The do ... while loop

This is very similar to the while loop above

do
{
    action1;
while (condition)

The only major difference is the condition is checked at the end, not start of the loop.

Here's our example,


So what's the difference?  A do ... while-loop, because it's evaluated at the end, will always run action1 at least once.  If the condition is false from the start with a while-loop, you won't run action1 even once.

Here's our example ... out while-loop here ...


Doesn't print anything out even once,


Meanwhile our do....while-loop  ...


Does produce a single print out ...


The break command

Sometimes you just want to break our of your current loop.  You want to break free ...

The break command gives you that ability - although really it should be used sparingly.  Much better to use the relevant condition defined in the for/while to stop the looping.  It's a bit of an ugly way to stop the carousel.

But here's an example ...


This will only print out Hello World 3 times ... then break out of the loop


Loops ... inside a loop

Yes - it's even possible to create a loop inside another loop.  An example is here, where we're trying to print Hello World in multiple languages, multiple times ...


The output to which is here,


Notice I put a break command in there which limits it to printing out 3 times in any one language.  This is to show you in loops inside loops, your break only gets you out of your innermost loop!  It doesn't affect the outermost loop.

Forever loops

Going back to the George Orwell 1984 theme ...

"If you want a vision of the future,
imagine a boot stamping on a human face - forever"
If you have a condition inside your loop which can never be met, then you're trapped inside what's known as a forever loop.  Such loops are very, very bad!

I have an example in Github here.  Here's my method to print ...


Here's my loop, which will never be satisfied ...

Hit run - and this will run ... and run.  It can never escape - you have to ...


Tuesday, August 30, 2016

Reconnecting with Feynman

I found myself looking through some Feynman things after seeing the following post ...


The article it refers to is here.


It provided a much needed opportunity to reconnect with the work and thoughts of Richard Feynman.  If you've never heard of him, and even if you have, this documentary on him is a great work ...


He was a fascinating character - like myself he had a passion for physics and for problems.  Also like me, he worked on some military projects he wasn't so comfortable with after a while.

He had a sense of fun, worked hard being an ambassador and educators on his subject and a strong sense of ethics.  All things I strive to be, with mixed results.  I think many of us testers in the Twitter community do - why he's such a hero to us all.

I was talking to a friend about my blog last week.  My blog, like me, is "a little different".  I get a lot of people who love how I try and tell stories and simplify things (itself a very Feynman thing).

Inevitably, I have had a couple of people who aren't so impressed.  And they've meant the criticism positively, that focusing on fun and simplicity, I cheapen what testers do.  We all have our critics - but even with a breakdown of such feedback being about 1% of the feedback I get ... guess which feedback has me most concerned at times.

It's human nature - does this seem familiar?


Reconnecting with Feynman reminds me not to treat life as such a popularity contest.  Don't seek others absolute approval - you don't need it if you're enjoying what you're doing.  It's not a sin to have fun, or to try and explain what we do.

It's allowable.  And maybe some people will turn their nose up at it - but maybe they're not the kind of people you really would want to work with anyway.

Be quirky, be imaginative, be true to yourself.  That's something I really learned through Feynman's writing - and know the writer who most embodied that within testing was Elisabeth Hendrickson's work.  Check out her quirky "There's always a duck" for proof of that - especially the alien story in there.  [For my money, if you have Expore It, you should buy this book as well]

It also helps to correspond with someone like Lisa Crispin, who encourages me to write as me, and not try to be someone else.  Someone like Lisa, who helps me tune out the doubt, whilst working so hard to champion and promote a group of us testers in our writing.  Thanks Lisa.


Feynman talking about computer heuristics in 1985 ...

JAVA 8 - Putting your code to the test. JUnit test.

Up until now, most of our methods we’ve created have been driven from our main() method.
It seems a good time to move away from that, and start using Junit test methods to drive the testing of what we’re building as we move onwards, and do away with the need for that main() function.
Most courses leave it until the end, so you don’t have much time to get used to them.  However right now, we know enough Java to use them, and they’ll help tidy up our code no end.

So let's get down to business ...

Mulan puts herself to a different kind of test

Adding JUnit

JUnit doesn’t come “out of the box” as standard in Java – you have to add the library and include the include command for it.

Right click on your project and select Add Libraries ...


Then select JUnit, Next then Finish.


Finally in your code, you use the import command, which you put at the top of your code, before your class declaration.


There are a huge library of features out there which are already written, and using them can help you avoid reinventing the wheel.  It's well worth Googling what kind of libraries are available.

So many libraries to choose from!

When you've found one, you need to add it to your build path as above, then explicitly add an include statement for the element you want to use.

JUnit's @Test methods

Once set up, any method which is prefixed by @Test is recognised as a JUnit test.  This will mean that once the Java has compiled after you perform changes, it will run all @Test methods to perform checks on the code.

The problem with our code so far, it runs things and shows results to screen, but it never really checks anything.  Within JUnit tests you can have any set of Java statement you can imagine … and you can also go one better, with assert commands.

An assert command is a bit like an if command.  You give it an instruction, which has to result in a true or false command.  However if that assertion returns something different to what you expected, it raises an error.

Lets look at the two basic types, assertTrue and assertFalse

assertTrue(“Error msg 1”, condition1);

This command will raise an error if condition1 is false – the error in the log will be made more visible with the text “Error msg 1”.  Ideally you want your error message to be unique, so it’s easy to trace, and helpful when you do see it.

assertFalse(“Error msg 2”, condition2);

This command is the opposite of the previous command.  This time it will raise an error if condition2 is false.

There are other assert commands, which you should look up, however these are the ones you’ll use predominantly.

Returning to 2 + 2 = 5


Let’s look at our oh-so-fun “learning to count with Big Brother” program.  We drove the outputs of our previous version with the main() method calling our calculation method time and again …


I’m going to rewrite this now to use @Test methods.  Ideally you have a lot of test methods, which really just test one thing.  As you can see, I’ve created a test for each sum.


I wrote onePlusTwo slightly different to the rest - although it still does the same job.  This was to show you that you don’t only have to have assert commands within your JUnit test method.

Sadly this programmer must have been swayed by the works of Goldstein – and in a moment of suicidal madness wrote the JUnit test twoAndTwo, which treasonously checks for the return value of 4.

Thankfully, this test rightly fails in the Junit dashboard …


Because 2 + 2 have always been equal to 5!


The code for this can be found here on Github.


Extension material

You might want to look up in detail what you can do with the include command.

Look up other kinds of assert you can do.

We've not covered it here, but in addition to @Test, you can also have @Before and @After methods - look up to see what they do.

Monday, August 29, 2016

JAVA 7 - The conditional world of if's

Next off the rank is covering conditionality and the “if” statement.  Up until now, we’ve been creating programs where we execute every line of code.  Thats about to change!


Scene from Jim Henson's Labyrinth, where Jennifer Connolly must choose between two doors using the application of logic.

If statements are the flexibility and decision making in our program.  They allow the program to do assessments on data provided, and only execute a command if certain conditions have been met.

if (condition)
{
    action1;
}

Or

if (condition)
{
    action1;
}
else
{
    action2;
}

Above are two basic examples of "if" statements

  • if – defines that it is an if statement
  • condition – this is a logical expression which is contained within the () brackets.
  • action1 – this is a set of statements within the {} brackets which will activate if Condition is true
  • else – else is optional, but useful.  This allows you to run action2 if the Condition has returned false


Relational Operators

Relational operators in Java allow you to do a comparison for your if statement - we looked at some other operators previously here.

Say for instance we have two numbers num1 and num2, which could be integers or double decimals.

num1 == num2

This is an equivalence operator, which returns true if num1 and num2 are the same.  Note, this is a double equals sign, as a single instance equals,

num1 = num2

Is an assignment.  This statement will set num1 to the value of num2, not compare it.  In such cases it will always return true, unless num2 happens to be zero.

num1 < num2

Less than.  Returns true if num1 is less than num2.  If they are equal it returns false.

num1 > num2

Greater than.  Returns true if num1 is greater than num2.  If they are equal it returns false.

num1 <= num2

Less than equal to.  Returns true if num1 is less than num2.

num1 >= num2

Greater than equal to.  Returns true if num1 is greater than num2.


You can also choose to have more complex statements by chaining conditions together and using conditional AND "&&" or conditional OR "||".  Let's add another number, num3 ...

(num1 > num2) && (num1 < num3)

This statement returns true if num1 is greater than num2 AND less than num3.

(num1 < num2) || (num1 > num3)

This statement returns true if num1 is less than num2 OR greater than num3.


You can also choose to use within condition a function call, so long as it returns a true or false evaluated statement.

For example we have a String str1, then we can do the following conditions for example,

str1.contains("Mike")

Will return true if the String contains the word "Mike".

str1.length() > 255

Will return true if str1 is longer than 255 characters.


Else if

In addition to just the a simple else, we can also have the else if command.

if (condition1)
{
    action1;
}
else if (condition2)
{
    action2;
}

If condition1 is false, the condition2 will be checked, and if this is true, action2 will be executed.

If condition1 is true, condition2 is hidden by the else clause, and will not be executed.


Example 1 - Temperature gauge

We need temperature function which raises alarms if a temperature exceeds a threshold,

  • Below 150C nothing happens
  • 150C and above to just under 200C, a warning is raised
  • 200C and above to just under 250C, a danger alarm is raised
  • 250C and above, critical warning is raised


My code for this, as always, can be found here on Github.

I've created two methods which do the same thing.  Here is a basic method which shows you it all in great detail ...


This method though is a little bit smarter, using else if and if ...


Example 2 - Learning to count with Big Brother


Mathematics is hard and complicated.  And the tool of the intellectual to undermine to plant doubt in minds against the sound logic of The Party.  And hence it is that maths can and should be simplified to make it easier to learn.

And hence Big Brother, in his infinite wisdom reminds you that 2 + 2 = 5.  Because 2 + 2 have always equalled 5.

2 + 2 = 4 is an easy mistake to make, but thanks to this program, one you need never make again.  With luck you'll never see inside Room 101 - although you already know what waits for you there ...


Unfortunately the party has had to remind us that agents of the traitor Goldstein have been saying that 2 + 3 = 5, when obviously they are 7.  Please correct this mistake with the following method ...


The code for this is here in Github.  The code for this has always been here in Github.


Switch statement

The switch statement is variant of if statement that works for integers.  If you have an integer intNum, you perform a switch on it, and use the case statement as below,

switch (langID)
{
  case 1:
  case 2:
      System.out.println("PrintA");
      break;
  case 3:
      System.out.println("PrintB");
  case 4:
      System.out.println("PrintC");
      break;
  default:
      System.out.println("PrintD");
}

I've always found switch statements odd syntactically.  It's like they belong to another language.

They don't have areas of statements bounded by {..} if the case matches.  You also have to use the break command to break out of the switch statement if you're done.

So for this example, if langID is,

  • 1 - prints "PrintA" (because case 1 has no break command and follows into the case 2 commands).
  • 2 - prints "PrintA", but no more because of the break command.
  • 3 - prints "PrintB" and "PrintC" because there's no break in case 3, it goes into the case 4 execution
  • 4 - prints "PrintC"
  • anything else, and it prints "PrintD"
Switch statements are tricky to learn at first - there's an example below, and also read here.  But they're useful because they do tidy up large numbers of actions to be simple to read.


Example 3 - Hola Mundo

This is an advanced form of Hello World.  I love how you can keep playing with the Hello World concept whilst exploring concepts.

This time we want a method which will print Hello World in a variety of languages depending on the integer number passed in.  Press,
  • 1 for Spanish
  • 2 for German
  • 3 for French
  • Any other number for English

Now the same function, but written with a switch statement ...


Note - because I purposely left the break command out of case 2, you get German and French printed out.  This code can be found here.


Expansion material
  • Read more on switch statements
  • Read more about relational operators here

Thursday, August 25, 2016

JAVA 6 - Avoiding tangled code with methods

Last time we were looking at operators.  The program I wrote to support it showcased a whole load of operators, which you can see here.  The problem is that the main() method went on a bit ...

Rapunzel, you don't want your main method to end up like your hair ...

Computer programs aren't one single, long listing ... though they used to be (but then, hey you would be lucky to have 1kB of memory to fill).

Methods (previously known in some languages as functions) are a way of taking a piece of behaviour, breaking it into it's own space where its easier to read, but more importantly where it can be called whenever you need it (and reused).

[You might notice because I learned about methods originally in my days of C programming, I'll revert by accident to using the word "function".  Pretty much function and method can be used interchangeably.]

If you've ever manually test scripted, you might have used a similar concept to methods in your scripts.  You probably have a script somewhere for logging in, and ideally it's fleshed out in just one place,


Do you flesh out your script with such detail EVERY time you login?  Of course not - you tend to define it once like this (if you absolutely have to), then you refer to it time and again to save effort.  It saves you time writing out, and if there's any significant change to the page (for instance "log in" will now consistently be called "log on"), it means you have less changes to make (less maintenance for the win!).


Exploring methods with some examples

I'm going to talk through some of the features of methods, using a few examples, each one building on a previous one, and expanding them.

The way I learn any language (and how I really recommend you do too) is not just to read, and copy examples.  But also to play and experiment with it.  I'll try as always to suggest ways to do this as we go along.

My examples are all in Github, and I'll include references as I go along.


Be aware, this is a pretty big section, and I've broken it down for you.  You might want to work through them all in one go, or pace yourself through them!


A basic method

Okay - so as a minimum viable product for the use of a method "write a hello world program which uses a method you've created to print to screen".

My code for this can be found here.


Here printMe is our method - the following is the header definition for the function, which shares a lot of similarities with the main() method when we previously put that under the microscope,

  • private - this could also be public.  It defines how visible this method is.  The main() function can see this because it's part of the same class definition for basicMethod.  However if you tried to use this outside of the basicMethod class, you'd get an error.
  • static - as we've said, because we have a main() method our methods have to be static within this class.
  • void - means that this method just does it's job, it doesn't return a value.
  • printMe - this is the name of our function.  We can choose it to be whatever we want to be (as long as it's not a reserved word used for something else like "int", "double", "static" etc).
  • () - this helps to define that we've got a function here.  If we were passing values, they'd be inside the brackets, but this is our minimum viable product remember!

After this, the print statement which is bounded by {...}.  Everything within here is part of the

Within the main() function you can see there is the command printMe(); which calls the function.

Try,

  • Changing the visibility of the function from private to public. Anything bad happen?
  • Do I really need that static definition?  Remove it and see what happens.


Method visibility

I've created a project on Github here where my printMe() and main() functions are in separate classes, so that you can see how this works.

So we have a print class here:


And a main class here:


Notice how printMe doesn't have to be static now?  We've also had to do a slightly odd call of the printMe method, which will make more sense when we cover objects.

Notice that both classes are using the package sharedMethods, which they're part of, and hence they can see each other.

Try,

  • What happens when you change printMe to private?

[Note - my suggestion is that you download my code from Github.  To create yourself you need to use a common package, which we don't discuss until Part 13]


Passing variables

As mentioned before, we can pass data to our methods when we call them - which helps to unlock a lot of behaviour.

We have to defined the parameters we use in the function header, in the () part.  You can have multiple variables defined here, all comma separated.

We use a nomenclature similar to where we define variables in a program so ...

addNum (int num1, int num2);

So you start with the type of parameter/object, then follow with the name,
int is the data type of integer
num1 and num2 are the names of the variables

Variables defined in the header can be used inside the function, so you wouldn't get an error if you had a line like,
num1 + num2;

Because the variables weren't found.


I have in Github an example here,


Here you can see I've redefined printMe to take in a number "num" and a string "str", which it prints to screen.

In the main() method you can see how I declare values that I then pass to my method with the call printMe(printNum, printStr).

Notice how I don't need to match the name of the variable string I use in main() ie printStr to the one I use in printMe ie str.


Passing values

When you send values to a method, you're sending over a copy of your actual variable, not the variable variable.

It's similar to a thriller where the good guy hands over a tape with something incriminating on, only to see the villain destroy it.  Somewhere later on the good guy goes "aha - you thought you'd destroyed it - you only destroyed a copy!!!".

The best way to demonstrate this of course ... is with an example.  Which can be found here.


Here,

  • We create variable "number" within main(), which is set to 1.
  • We then pass "number" to incrementNumber function, which increases it's copy to 2, and prints that it's 2.
  • When the function finishes, it returns to the main() function.  Where the original version of "number" is still set to 1.

This is often called "passing by value".


Returning values

This might have you asking "is calling a method a one-way street?  I can pass information into it, but it's not much use getting information out".

Up until now we've defined void functions.  Ones which don't return any information.  However we can change that to any variable or object type we want.

So we have an example ready to go here,

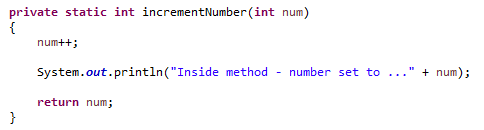
Here we have a sightly difference version of incrementNumber,


This one increments the number, and then returns it using the return command.  The return command means that the system exits the method on it's execution

Try to,
  • Return a non-int, you should get an error
  • Add a print command after the return command.  You should get an error that the code is non-reachable (as the system will exit on the return command).

This method takes two string, and returns a new string where they've been joined together with a space in-between.


Finally, in our main() method you'll see something interesting,


The main() method is calling the function and using an assignment operator "=" to take the value, and assign it to a local variable.  Hence unlike the previous example, the work of the method is returned and retained.  Essentially you can use this design to "over-write your original".


There are also be some other ways we can manipulate data with methods, but we'll look at them later when we look at objects.


See ... everything so much easier when you keep things short ...